Alfred5 - Bigger and Better

The Butterfly that is Alfred

There's a very important point in any project's life where it goes from being in a conceptual cacoon to breaking out and spreading its wings into a vibrant reality. I believe Alfred, my longest lasting project, just reached this point. If you don't know what Alfred is then I'd recommend reading this blog post where I talk about Alfred's history and goals. That blog post was made almost a year ago and since then I've been working on Alfred5 and today I'll be telling you all about it!

Truth is, I finished Alfred5 three months ago. Alfred5 released officially April 27th but since Alfred5 was such a monumental milestone for Alfred's journey, I put off writing this blog post- waiting for a time where I've grown to contain the vocabulary necassery to explain my excitement. I realized now, however, that such a time will likely never come. Alfred5 is truly an extremely important waypoint for Alfred's journey. Why you may ask? Let me show you.

Alfred5 Banner

The Importance of this Butterfly

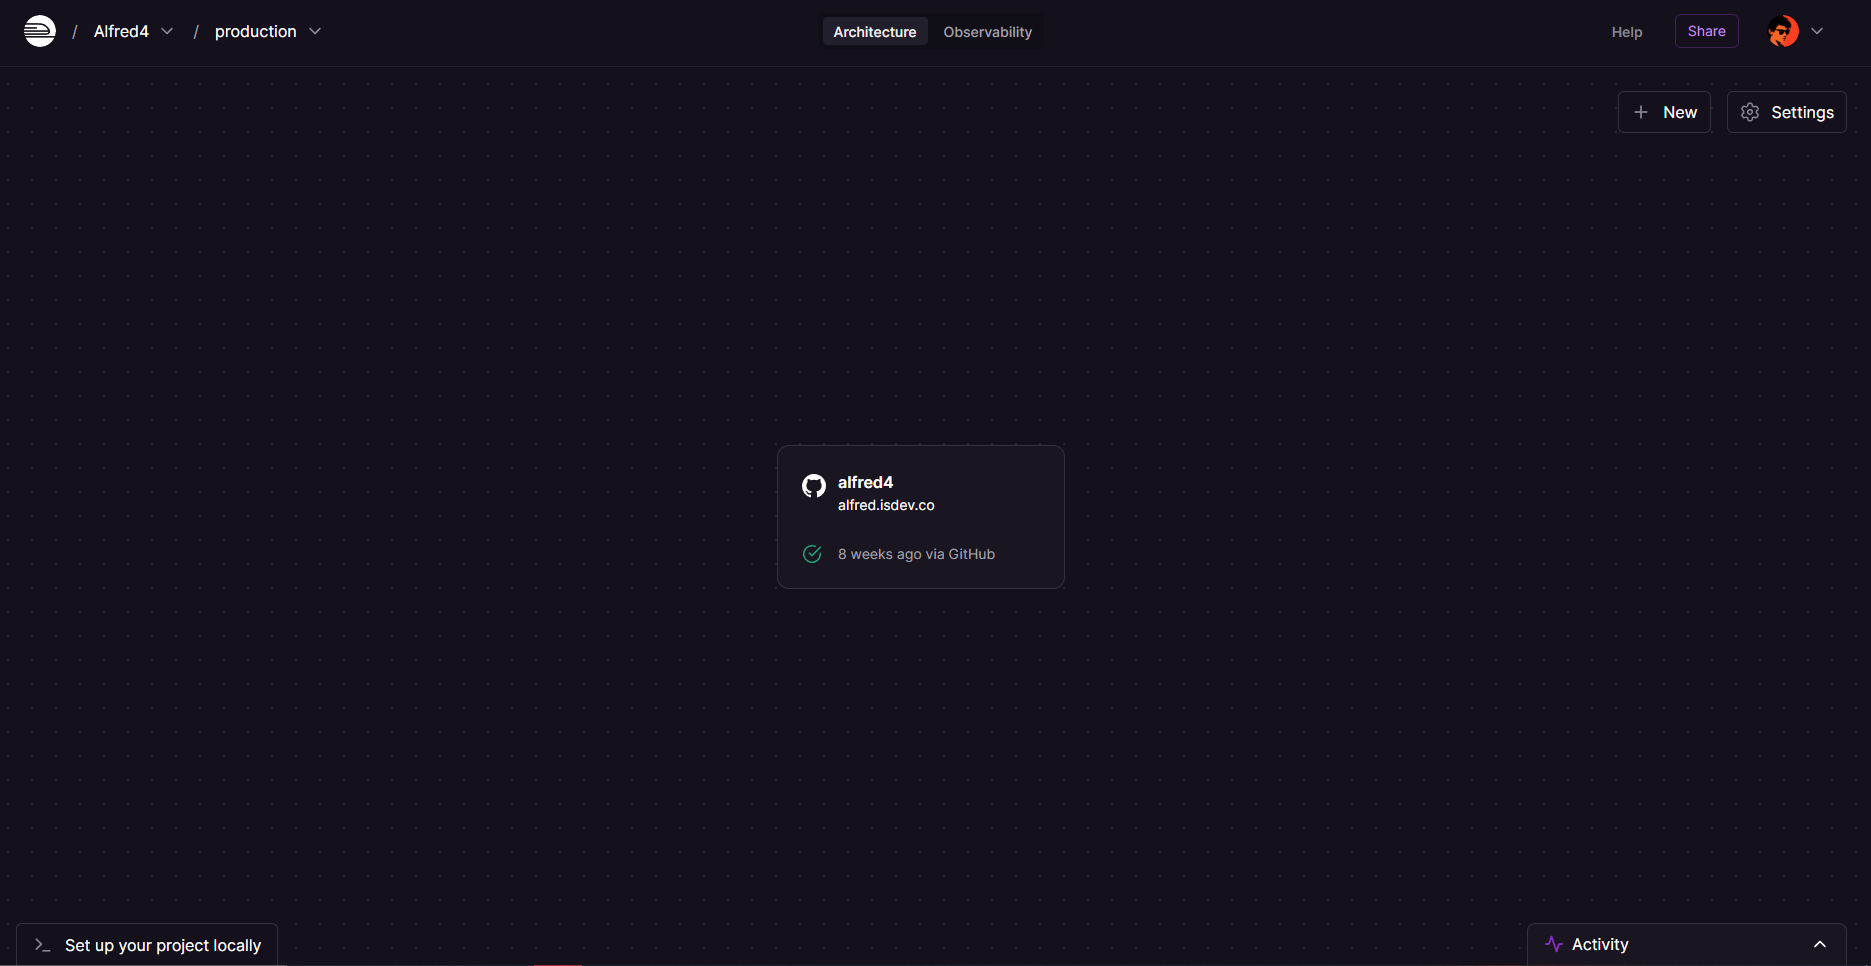
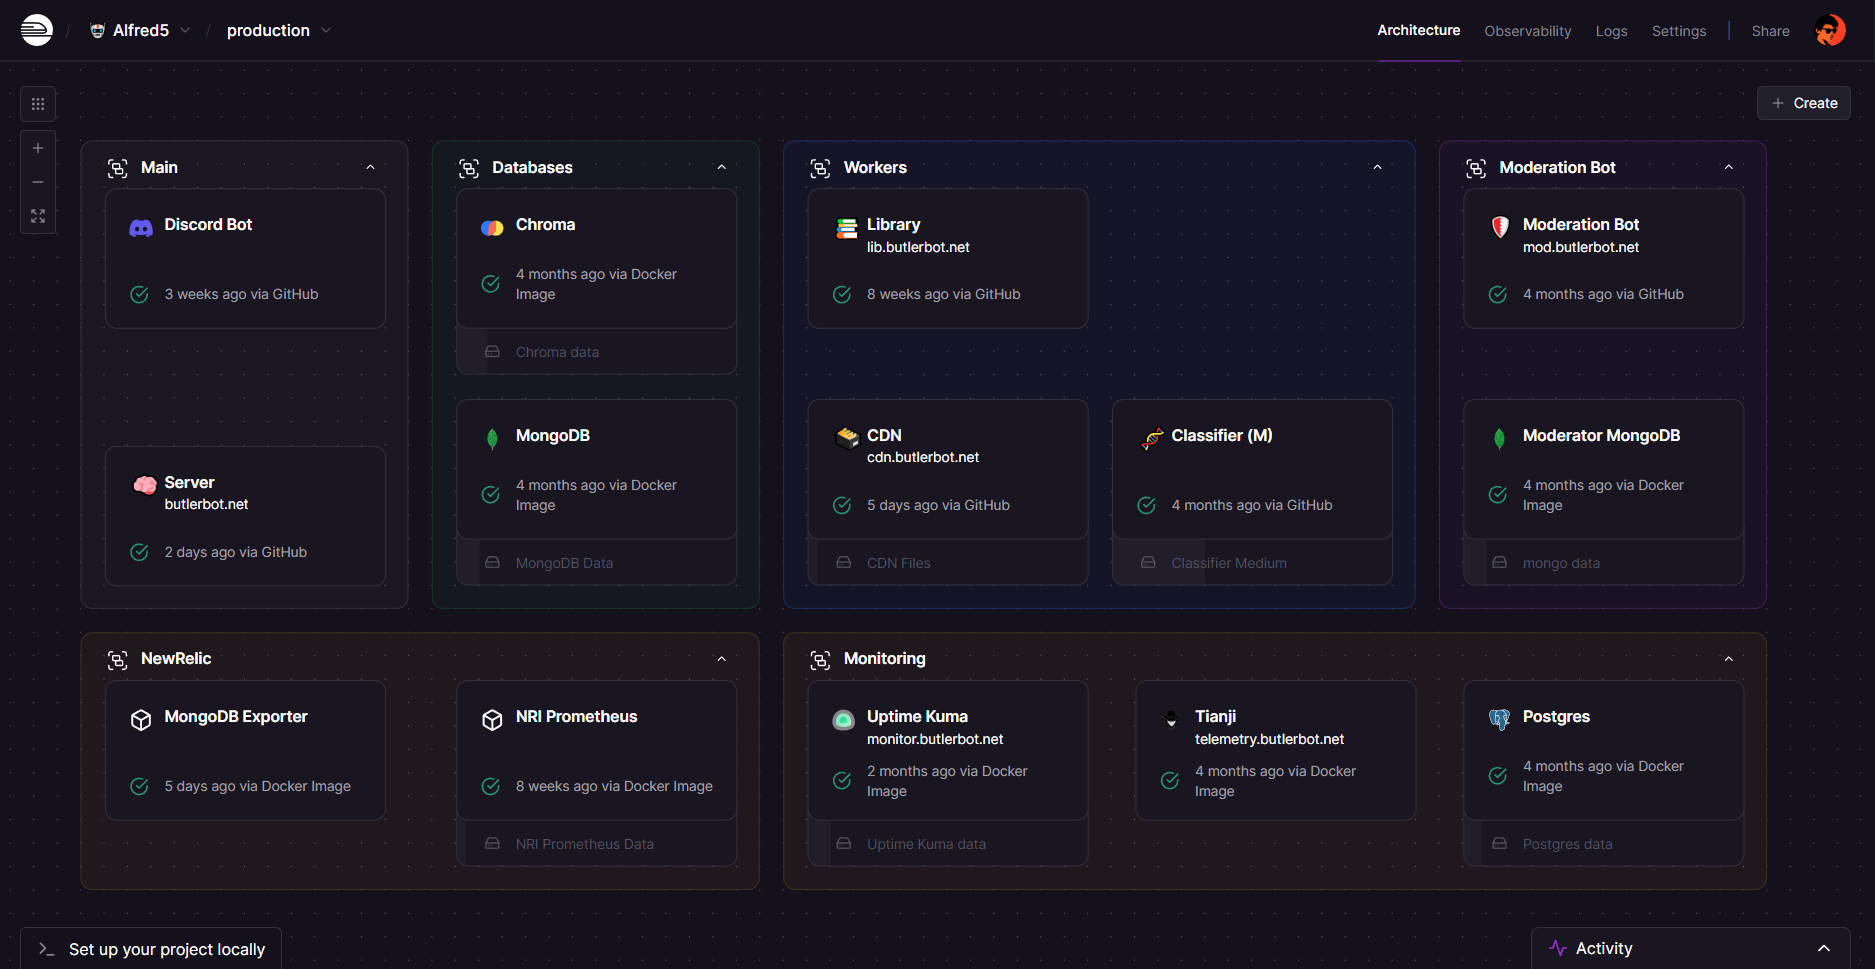
It's hard to put the difference of scale between Alfred5 and Alfred4 into words. So instead, I'll just show you!

Here's Alfred4's dashboard on Railway:

Alfred4 Railway Dashboard

and…

This is Alfred5's dashboard:

Alfred5 Railway Dashboard

I'm sure you don't need to me to tell you that Alfred5 is in a different league from any previous Alfred version. Alfred5 is like Alfred4 except bigger, better and just a bit bolder. Alfred5 does what Alfred4 does but on another level.

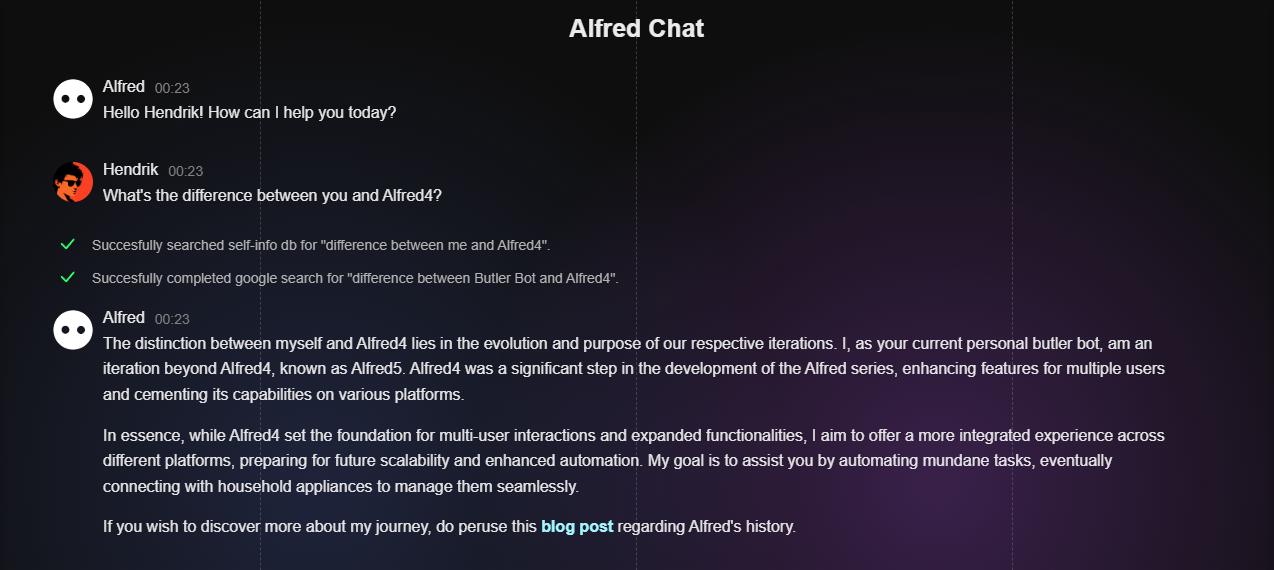
In fact, I'll let Alfred5 explain the difference:

Alfred5 explains difference

You may notice this screenshot is not from Discord and that's because it's not! Alfred5 comes fully packed with its own website. Alfred4 technically had web integrations too, although those were only utility endpoints that served only to make it easier for users to share their timezone and such with Alfred. Alfred5 however is fully independant from any third-party platform. Meaning, unlike Alfred4, you can use Alfred5 without even having a Discord account.

Ultimately, we're one step closer to Alfred's ultimate goal:

Alfred explains its goal

This was said by Alfred3 almost 2 years ago, I've been working hard making Alfred's wishes reality.

Of course you can still log-in with your Discord account on Alfred to use Alfred on discord. The only difference is now you can use Alfred independently from Disocrd. Alfred's website also comes with many neat features of its own, like the ability for Alfred to create Excel spreadsheets and to build inline applications via HTML, CSS and JS.

Let's go into the meat and potatoes of this though. Here's what Alfred5 can do!

The Abilities of this Butterfly

Apart from the before-mentioned abilities. Alfred can do the following:

  • Google Search: Alfred can browse the internet and find up to date and accurate information from it.
  • Analyze Websites: Alfred can read through articles and websites to give you in depth information on the contents of websites. Useful when paired with Google Search.
  • Manipulate Memory: Alfred has a persistent memory, he can store long term and short term memories and recall these memories at later dates.
  • View Images: Alfred can, naturally, also view images. This is useful when transcribing information, like asking Alfred to tablize a diagram.
  • Generate Graphs: Alfred can generate many different types of graphs and diagrams for you, like pie charts, or entity relationship diagrams.
  • Run Code: Alfred can run code, this is useful for complex operations or mathematical questions. Like asking Alfred to sort data or to calculate something complicated.
  • Set Reminders: Alfred can remind you on Discord about anything. These reminders can be set from the website as well. You can also specify where Alfred should remind you!

Alfred5 can also support many different types of AI, like AnthropicAI, OpenAI and GoogleAI. Although GoogleAI has been removed temporarily and will be added back once it reaches Alfred5's standards. Alfred5 also supports any platform of course and a desktop / mobile app is planned!

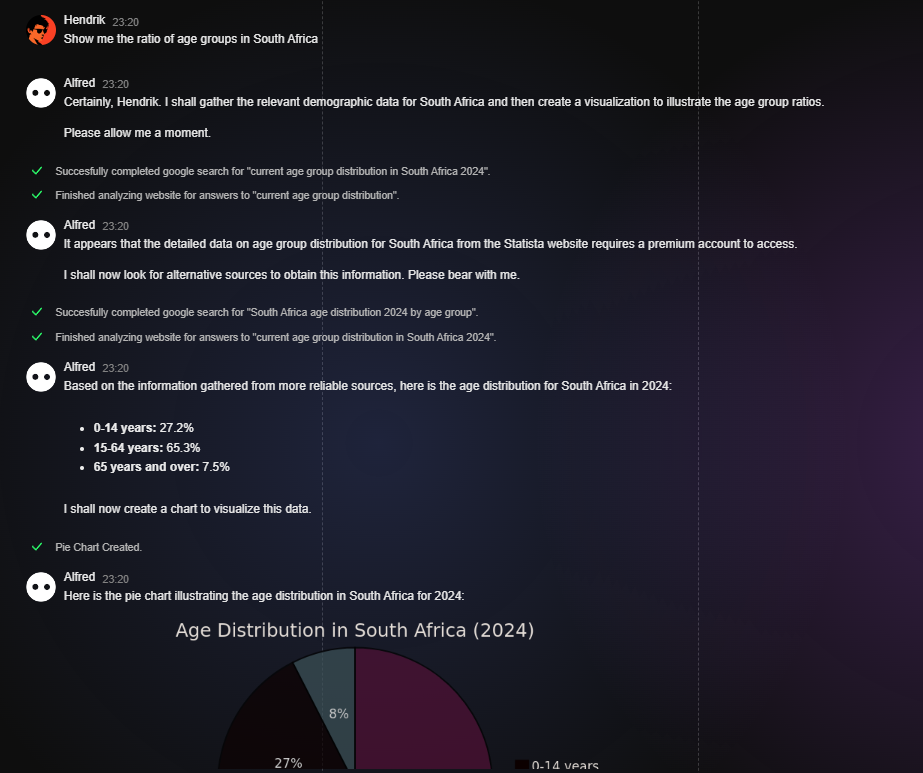
Alfred's many functions are useful on their own, and even more useful when combined, here's an example:

Alfred5 Usage Showcase

The Appearance of this Butterfly

Alfred5 went through quite the metamorphosis from being in a caccoon to waking up as a beautiful butterfly. As such Alfred's appearance has changed a lot! Alfred's branding used to be old-timy. The reason for this is because I wanted Alfred to appear as a traditional butler. Although Alfred5 being as advanced as it is - I decided to put Alfred through a bit of a rebrand. Alfred's new branding involves an extremely simple robotic face with a modern minimilistic design.

The die hard fans of Alfred has shown a lot of distaste towards this change initially. Although I feel this change is necassery and shows how Alfred matured. The simplicity is meant to reflect the simplicity of using Alfred. The old timy fashion doesn't fit within my views for Alfred anymore since I don't want Alfred to represent the past but to represent the future.

The Destination for this Butterfly

Remember, the goal for Alfred5- as I mentioned in my previous blog post, is to make Alfred more flexibile in terms of where it can run. Alfred now follows a more clustered and microservice-like structure, which allows me to improve aspects of Alfred indepedently and makes Alfred more flexible in general. I'm hoping I don't have to make an Alfred6 and that I can just keep building upon Alfred5.

I'm considering making a robot body for Alfred in some point in the future. We'll see how that goes! Remember you can check Alfred5's new website out here: ButlerBot.net


Read More

Creating My Own PaaS: Azure and AWS at Home (P2)

The 7 Recreations Of My PaaS

About 3 months before the creation of this post, I created a blog post reflecting on my time coding my own PaaS ( I highly recommend reading that blog post if you haven't already ). At the time I only finished about half of my PaaS - the backend, I still had to do the UI and add a few other bits and pieces. However, after completing the blog post, I wasn't all too happy with the state of the PaaS, so I decided to restart from scratch. Little did I know that this restart would not be the last.

Since then I've restarted, not once, not twice, not thrice but 7 different times. You may be wondering why, I wonder that too.. during the 7th restart, I decided that I wouldn't restart again. I knew if I kept restarting then I would take this project to the grave. Luckily the 7th version wasn't all that bad I'm quite happy with the state of my PaaS right now. So I finally decided to provide an update!

Why the 7th throw stuck?

Many hands make light work

The key difference between the 7th PaaS version and all the others is that the 7th version uses Nixpacks. For those who may not know, Nixpacks is an image builder made by Railway, it takes a project's source code and automatically builds an image for it that you can then deploy.

This "image building" part is an essential part of any PaaS because it makes or breaks the deployment process. Before I started using Nixpacks I was just throwing my own Dockerfile in a project which assumes the project is a NodeJS project, and for any other type of project, I'd have to manually make a new Dockerfile. This overcomplicated things by a lot, since I use Nixpacks now - I not only have automatic image building but my code is a lot more manageable.

Less is more, keeping things simple

Another big issue with the previous version is my tendency to overcomplicate. What I usually did was implement some sort of middleware between my app and the database that automatically caches data, and while it worked very well to make my app a lot faster, it also added a lot of unneeded complexity. In the 7th version, I tried focusing more on simplicity.

This made my code a lot less difficult to navigate and maintain, which made me enjoy working on it a lot more than I did before.

Polishing the Gem

Lastly, I feel telling myself that I won't make more versions really forced me to go back and refactor code to ensure longevity and robustness. I definitely still need to go back and refactor some more but I think it's totally manageable for now.

Cutting the Dead Weight

In the previous versions, I was using Cloudflare, not only for security and performance but also for SSL/TLS. However, I later found out that my app was extremely slow for no reason, a blank HTML page took 500ms to load - from a computer 5 feet away from the server the page was loading from. I immediately thought it was Cloudflare and tried disabling CF proxy, but it didn't help my cause, after 3 days of debugging and trying to find the cause, a friend asked me to disable Cloudflare entirely. After doing that my website was blazingly fast.

What happened was Cloudflare was routing my app's requests extremely poorly, requests for my website were coming from London. I reached out to Cloudflare and they said it was my ISP's fault, but I had friends from other continents test too and they had the same issues with it being unreasonably slow. I decided I'd just drop Cloudflare, the security benefits did not outweigh the slow speed of my site. After I dropped Cloudflare, my site's response times went from 500ms to 5ms.

New features

The new version also has a lot of new features, the biggest of which is a CD. A CD ( Continuous Deployment ) is a service that allows you to easily deploy completed code automatically. This was very needed in my case since it makes updating my PaaS a lot smoother and easier to do, which makes it easier for me to work on.

Another feature is statistics with Grafana, I can now monitor everything about my app using Grafana, which I initially only deployed to help me find the issue with load times I spoke of before, but it ended up being very insightful and I love just staring at my statistics!

Future Goals for the PaaS?

I have a few awesome plans for this PaaS, firstly - I want to add a db feature in the PaaS that allows me to easily deploy a database inside of my PaaS from a predefined image. Although I'm also content with using third-party database providers since they often offer extremely generous free tiers and also make migrating my project around a lot easier since I don't have to worry about migrating my databases, so I'm not in any rush to add this.

Another thing I want to add is a docs page, currently, nothing is documented, so it'd be a good idea to document a few things before I forget them, although if I do forget them then I can always just peak at the code, so this is also not on top of my priority list.

I think for now I can finally start migrating my projects onto my PaaS. It's been a blast working on this PaaS, I've learned so much while doing it, and I highly recommend it!


Read More

Code Craftsmanship: Never Nesting

Reviewing the practice: Never Nesting

This blog post will review a video about how to write cleaner code using a practice where you try to not nest your code. I will then give my thoughts on the video and comment on whether I think this is a good practice or not based on my personal opinions.

What is Nesting

In the video he talks about nesting your code, nesting refers to the practice of adding more code blocks within an existing code block, here's an example of a nester for loop in javascript:

for (let i = 1; i <= 3; i++) {
  for (let j = 1; j <= 3; j++) {
    console.log(`Outer loop: ${i}, Inner loop: ${j}`);
  }
}

We call this a nested for loop because there's a for-loop code block inside an existing for-loop code block. He mentions in the video that he'll refer to each indentation/nest in the code as depth, for each indentation the depth increases, one indentation is one deep, two indentations are two deep, and so on. I'll be referring to indentations similarly here.

How Never Nesting works

In the video he explains you can achieve never nesting using two methods, extraction and inversion. Here's an example to showcase both:

function example(param1, param2) {
  if (param1) {
    if (param2) {
      const convertedParam2 = (param1 + param2).toString(36)  
                    + "-" + Math.round(Math.random() * 9)

      for (let i = 0; i < convertedParam2.length; i++) {
        const letter = convertedParam[i]
        if (letter == "b") {
          return true
        }
      }

      return false
    } else {
       console.warn("Please Provide a param2")
    }
  } else {
    console.warn("Please provide a param1")
  }
}

To denest this function we can make use of the two methods mentioned earlier, first extraction, we'll take the for loop out of the function and put it into its own function.

// extracted function
function convertNumber(n) {
  const r = Math.round(Math.random() * 9)
  return param2.toString(36) + "-" + r
}

// extracted function
function containsLetter(word, letter) {
  for (let i = 0; i < convertedParam2.length; i++) {
    const letter = convertedParam[i]
    if (letter == "b") {
      return true
    }
  }

  return false
}

function example(param1, param2) {
  if (param1) {
    if (param2) {
      // extracted functions used to be here
      const convertedParam2 = convertNumber(param1 + param2)
      return containsLetter(convertedParam2, "b")
    } else {
       console.warn("Please Provide a param2")
    }
  } else {
    console.warn("Please provide a param1")
  }
}

Now we can make use of inversion, this is where we take conditions and invert them so that the rest of the code becomes the condition, removing the nesting required for the condition.

function convertNumber(n) {
  const r = Math.round(Math.random() * 9)
  return param2.toString(36) + "-" + r
}

function containsLetter(word, letter) {
  for (let i = 0; i < convertedParam2.length; i++) {
    const letter = convertedParam[i]
    if (letter == "b") return true // less nesting
  }

  return false
}

function example(param1, param2) {
  if (!param1) { // inversed condition
    console.warn("Please provide a param1")
    return
  }

  if (!param2) { // inversed condition
    console.warn("Please provide a param2")
    return
  }

   // there used to be a big nest of conditions here
   const convertedParam2 = convertNumber(param1 + param2)
   return containsLetter(convertedParam2, "b")
}

Mental Storage

He mentions that when over-nesting, he finds that he has to keep all these conditions in mind when going through the code, which becomes very hard to do the more you're nesting your code. When you denest your code, you can discard the conditions that were checked earlier in the code and you only have to focus on the core code. It makes less difficult to go through old code and understand it.

Conclusion

I completely agree with this coding methodology, and I took a lot away from this video, never nesting makes your code easier to understand and makes it more readable and promotes self-documentation by forcing you to split big functions into smaller functions. Since watching that video, I've adopted the "never-nesting" approach in my own programming, and it has significantly improved the way I write and understand code. It's a game-changer for sure!


Read More

0

/

2